Guides & tutorials
Get started with Openframe
On this page you will find support videos and tutorials that guide you through the first steps so you can quickly get started using Build or In Use.
- Sustainability Manager
- Getting started
- Choose a criteria scheme
In Openframe, you have the option to opt-in to the criteria schemes: DGNB certification schemes (2016, 2020, 2023), the Voluntary Sustainability Class (VSC) requirements collection, or MBA 2016 in your project. Find out how to choose one or more of these criteria schemes.
See which sustainability schemes you have access to here.
- Create teams
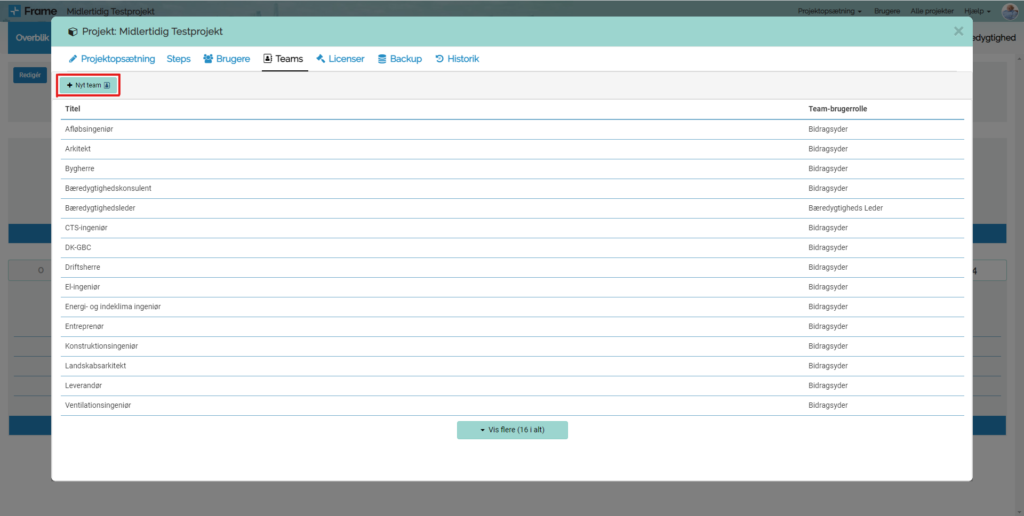
At the start of your project and along the way, you can create teams that users can be divided into. To create a team, follow these steps:
- Tap “Project setup” at the top of the screen and then select “Teams”
- Tap on “New team”
- Fill in the details of the team you want to create
- Finally, tap “Save”. You would then be able to add users to this team
- Choose a criteria scheme
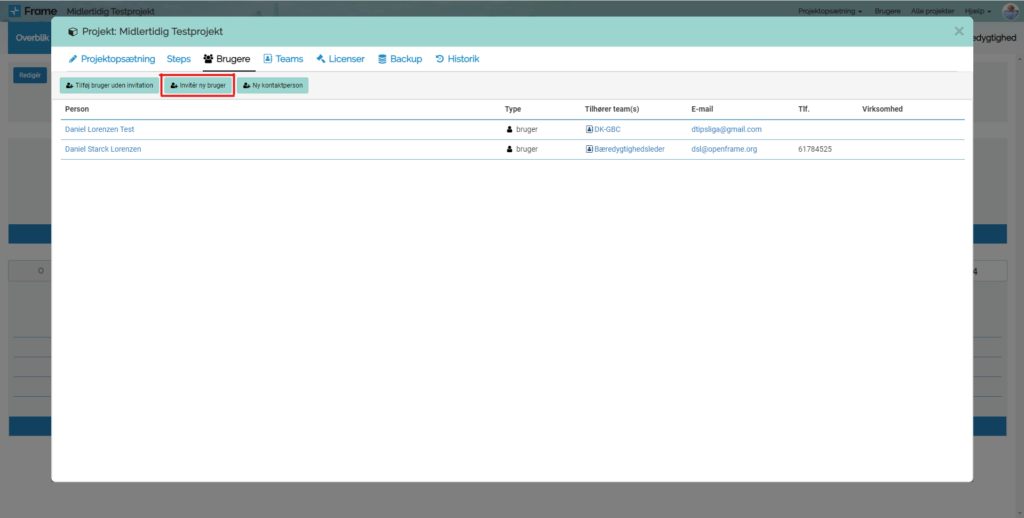
You can invite users to your project at the start of your project and along the way. You can do this quickly and easily by following these steps:
- Tap “Project setup” at the top of the screen and then select “Users”
- Tap “Invite new user”
- Fill in the details of the person you want to invite and select which team the user should be part of
- Finally, click “Invite user”. The invitee will then receive an email and a guide in the email on how to set up their account
- Change step
- Copy tasks to current step
Watch this video to see how to copy assignment answers from a previous step to the current step. In this example, the tasks are copied from a DGNB main task, but the procedure is also applicable if you want to copy tasks in your own criteria or in the FBK
- Preparation for Conformity check
- Send documentation for Conformity check
1. complete the main task
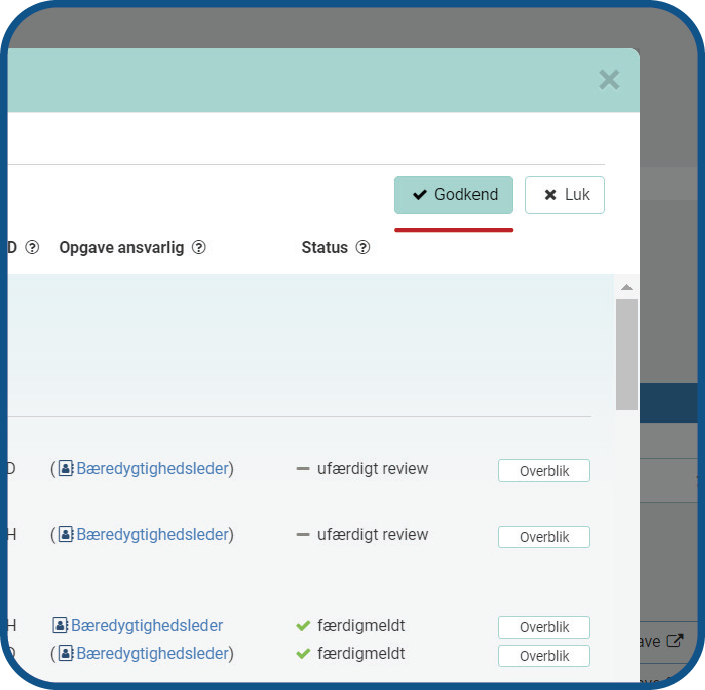
Once all indicator tasks are set to completed or reviewed, you can finalize the main task by clicking “Approve” (see Figure 1 + 2). Remember to check that the tasks are marked as either intended or documented.
When the main task is approved, time-stamped result files are automatically generated for the RFBB to use in their review.
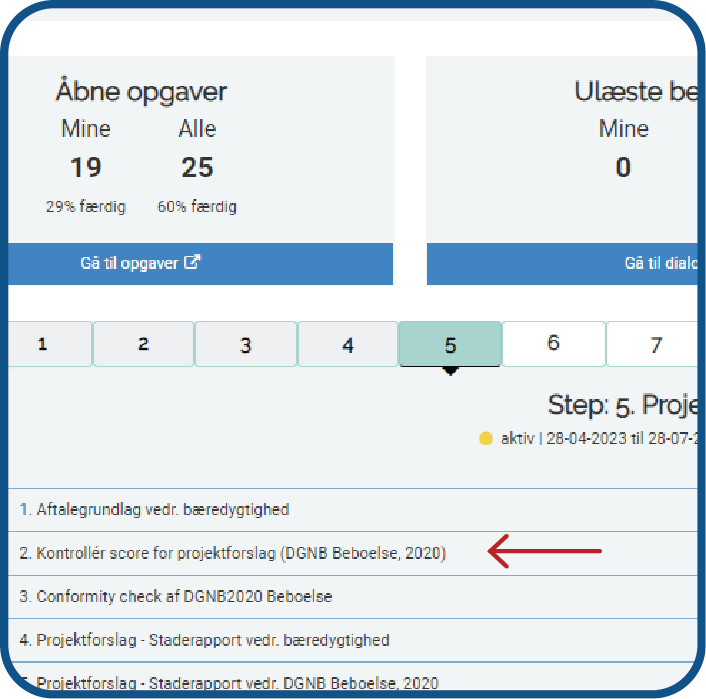
2. Change step
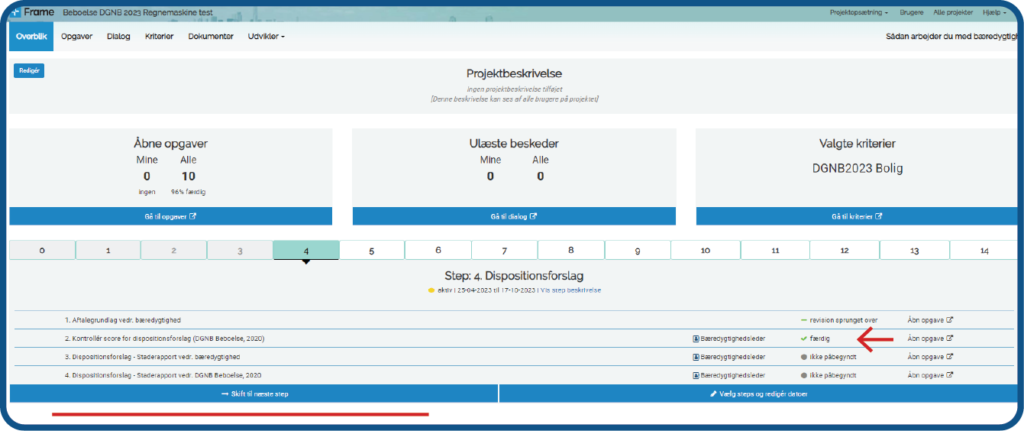
While the compliance check is running, the main task must not be reopened. If you want to continue working on the criteria tasks, switch steps (see Figure 3) and continue working on the new step. Check how to transfer tasks from the previous step under “Copy tasks to the current step”.
If there are comments on individual tasks in the compliance check, you can reopen these tasks and continue working on them once the compliance check is over.
3. invite RFBB to the “Sustainability Leader” team
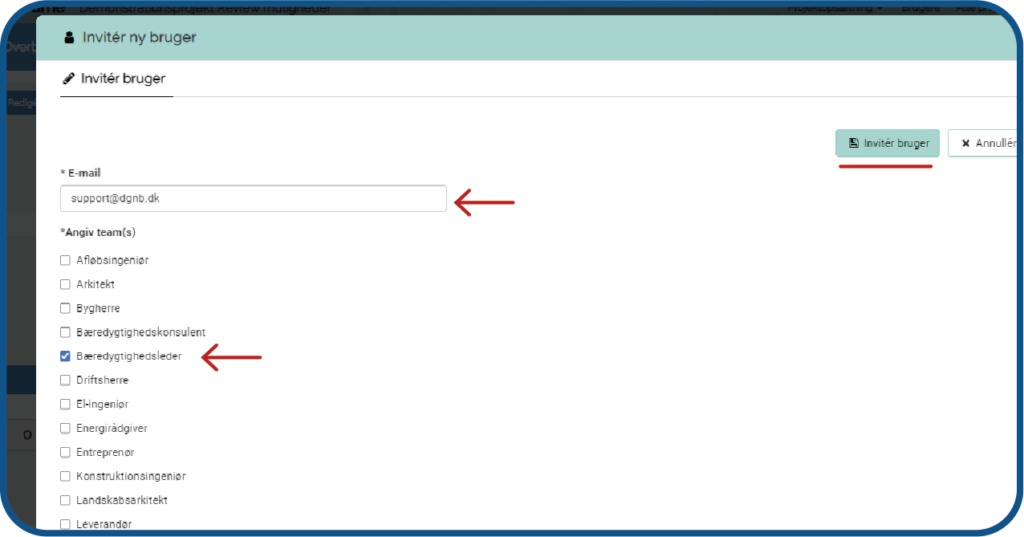
Under the menu item “User” you can now invite the RFBB to the platform. To do so, click “Invite new user”, enter the email support@dgnb.dk and add them to the “Sustainability Manager” team (see Figure 4).
4. inform RFBB that the documentation is ready
Inform the Council for Sustainable Construction via the contact form here that there is material ready for review and a link to the project. Note in the form which step the review should be done in, so that RFBB can easily find the review results.
Download the guide here
Change of practice from d. October 24, 9am: Contact form replaces the support email:
Cf. comment in the RFBB newsletter from October 20: “Ongoing correspondence with the support email or support emails awaiting a response will be answered in the usual way via the support email.”
- Transfer scores from Openframe to Evaluation Matrix (DGNB2016)
When you eventually need to submit an evaluation matrix for a compliance check to the Council for Sustainable Building, you can quickly transfer all the score values from Openframe to the DGNB evaluation matrix.
Here’s how to do it:
- Click on the “Criteria” tab in Openframe
- Export the score to Excel. You will find the “Export” button in the top right corner of the “Criteria” tab
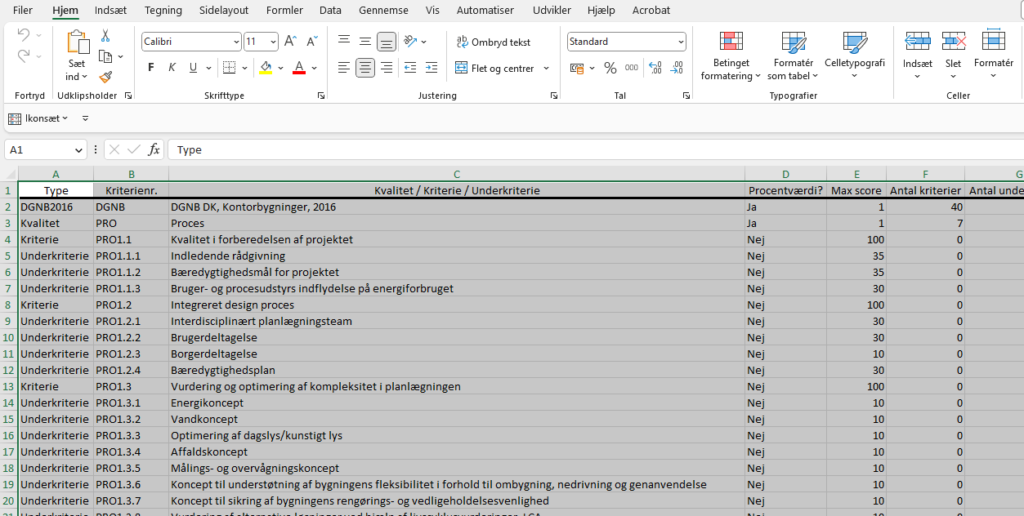
- Open the exported Excel file and select everything (CRTL+A) and copy the selection to the clipboard (CRTL+C) – (see Figure 1)
- Open the Evaluation Matrix and tap the “Frame input sheets” tab.
- Select the yellow cell and paste from the clipboard (CRTL+V) – (see Figure 2)
- Click on the “Evaluation Matrix” tab and you can now see all the score values transferred from Openframe to the matrix
- Check if the overall score matches the score in Openframe.
*Please contact us at support@openframe.org if you need help

- Mixed use
- Add mixed use to your project
To set up your project for mixed use, watch the video to the right or follow these steps:
- Go to “Criteria” and click on “Select sustainability schemes”
- Then select “DGNB 2020” change manual, title and area as needed
- Finally, press “Add” and then “Save” in the top right corner
- Then common documentation must be added if the criterion in question is generic for the entire project.
- Go to “Criteria” and then select the main DGNB scheme in the top right corner (Here you will also see the new scheme you have added)
- Under the “Commonly documented” column, you must then check the criteria that must be commonly documented.
- To set targets for both the primary and secondary use type(s), go back to “Criteria” and then select the primary sustainability scheme in the top right corner
- Click “Revise metrics” and then fill in the metrics for category, criteria and indicators by clicking “Edit” on the far right side
- Close the window when you are done and select the secondary sustainability scheme in the top right corner
- Then do the same as in step 8 with the secondary sustainability scheme(s)
To see a more detailed guide and the impact on the project to add mixed use, click HERE
If you want to see a guide for mixed use in existing projects, click HERE
- Contributor
- Getting started
- You have been invited to an Openframe project
You will contribute to a project where Openframe is used for sustainability management. Here’s how to get started. Watch this video to find out how to get started.
- Sustainability Manager
- Getting started
- The first time you log in to the platform
Once your project is created on Openframe In Use, you will receive an invitation by email
- Access your invitation email and click the link to enter the login page
- Tap “Forgot password”
- Enter your email and press “Send”
- You should have received an email about password reset by now
- Click the link in the email to reset your code
- Enter a password of your choice and finish by pressing “Reset code”
- On the login page, you can now log in with your email and the code you just created
- Enable email digest
If the email summary is enabled, you will receive an aggregated email with information about what has happened in the platform over the last 24 hours. For example, you may have been assigned new tasks or there is a message for you in the platform. The email summary is automatically turned on and lands in your email inbox at 7am.
Enable email summaries:
- Navigate to the “My Profile” page
- Check the “Enable email digest” checkbox
- Add project information
Once you have entered the platform, you need to fill in general information about your project. This can be done by following these steps or watching the video:
- Tap the small pencil on the front page next to the field with information about your project or tap “Configure project” in the bottom left corner
- Fill in the project information in the fields provided and optionally add an image in the form of an image file in the top right corner
- Finally, tap “Save” to save the changes
- Users and teams
- Invite users
Invite users to your project to get started. Watch the video here to see how to invite new users to your project:
- Navigate to the “Users & Teams” page from the dashboard
- Make sure you are in the “Users” tab, where you can see all users who are part of the project
- Press “Invite new user” and fill in the necessary information about the user
- Assign the user to their corresponding team
- Finally, click “Invite user” to send the invitation (the user will receive the invitation via the email you entered)
- Create new teams
Customize teams to fit your project. You can both rename teams or, as shown in this video, add more teams:
- Navigate to the “Users & Teams” page from the dashboard
- Go to the “Teams” tab
- Press “Create Team” and then fill in the details of the team you want to create
- Finally, press “Add Team” to save
- Process and periods
- Add period
You can organize your sustainability work in different periods. This could be a period for certification and subsequent periods for recertification.
How to add a new period:
- Navigate to the “Project settings” page
- Select the “Process & periods” tab
- Click “Add period”
- Fill in period details such as title, description, start date and end date
- Activate new period
If you have finished a period (for example, if you have submitted material for certification), you can activate a new period. Material from the previous period is copied over to the new period for further processing.
How to activate a new period:
- Go to the “Criteria” page
- Click on the period you want to activate (next in line)
- Click “Activate this period”
- Write a period conclusion for the previous period
- Click Activate next period
- Targets and scenarios
- Establish target figures
In Openframe, you can set targets for individual indicator tasks and create a goal for the overall project. Follow the instructions here to get started:
- Navigate to the “Targets and scenarios” page from the dashboard
- Click “Edit” next to the criterion where you would like to work with target figures
- Click on the question mark next to each task to read more about what the different values represent
- Select the values you aim to achieve in the drop-down menu
- Click “Calculate” to see the total calculated target figures
- Continue with other criteria
In Openframe, you can work with targets for baseline, scenario 1 and scenario 2. In baseline, you can map how the building performs here and now before (further) actions are taken to promote sustainability in the building. When you change certification period, the result from the previous period will appear as a baseline. This way, you can constantly compare target figures and see the progression.
Based on the baseline objective, you can now develop different scenarios for the project. On it, you can illustrate the different directions the project can take, so that you and the building owner can decide which scenario to pursue.
- Set goals in Openframe In Use
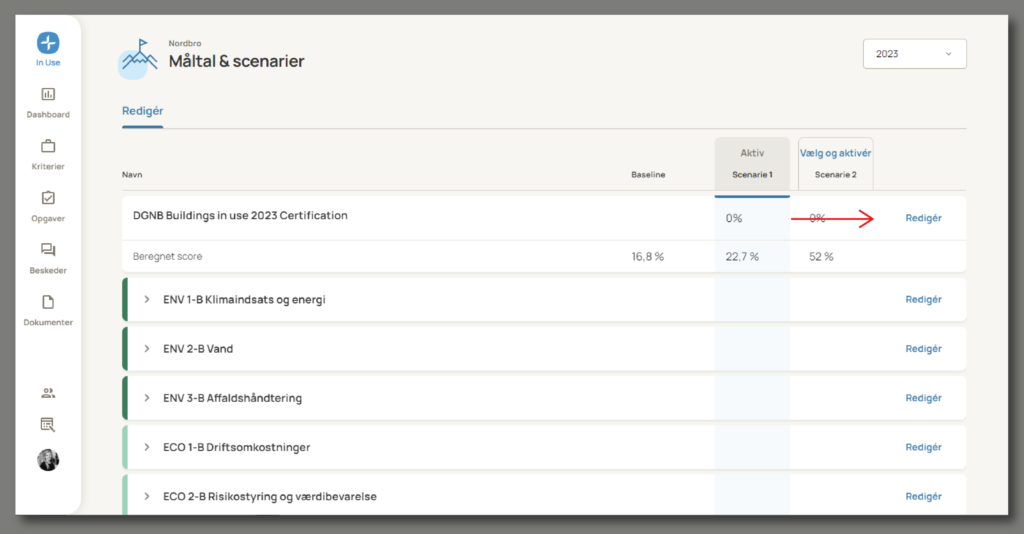
- Navigate to the “Targets and scenarios” page from the dashboard
- Click “Edit” next to the DGNB Buildings In Use criteria collection
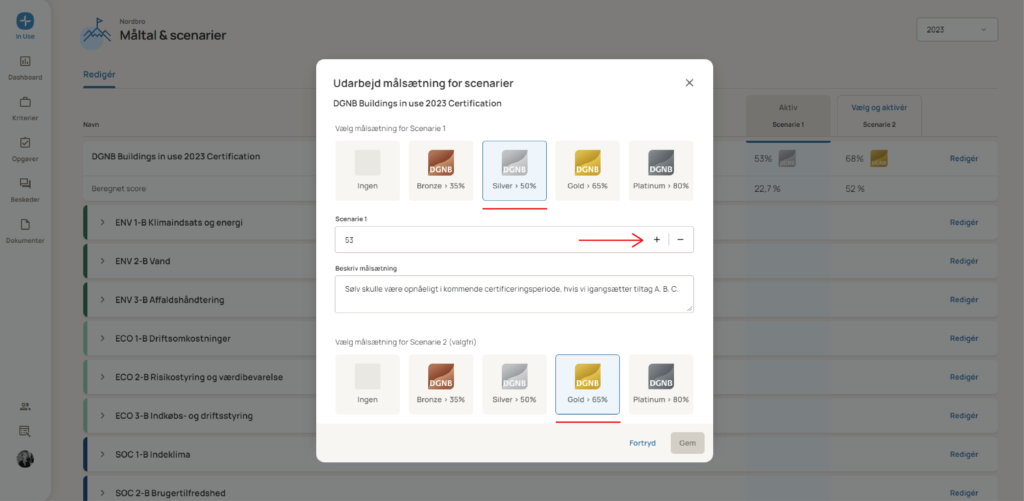
- Select the objective for scenario 1. You can choose between no certification, bronze, silver, gold and platinum certification
- Optionally, add a little buffer to the total target figure by clicking on the plus icon
- Describe the objective in prose
- Similarly, set the objective for Scenario 2
- Click “Save”
You can now compare the calculated score with the target for the scenario. And in this way, see how far you are from achieving your target.
- Select active scenario
- Navigate to the “Targets and scenarios” page from the dashboard
- Check that the site is working with target figures (actual figures) and objectives (objectives for the overall certification)
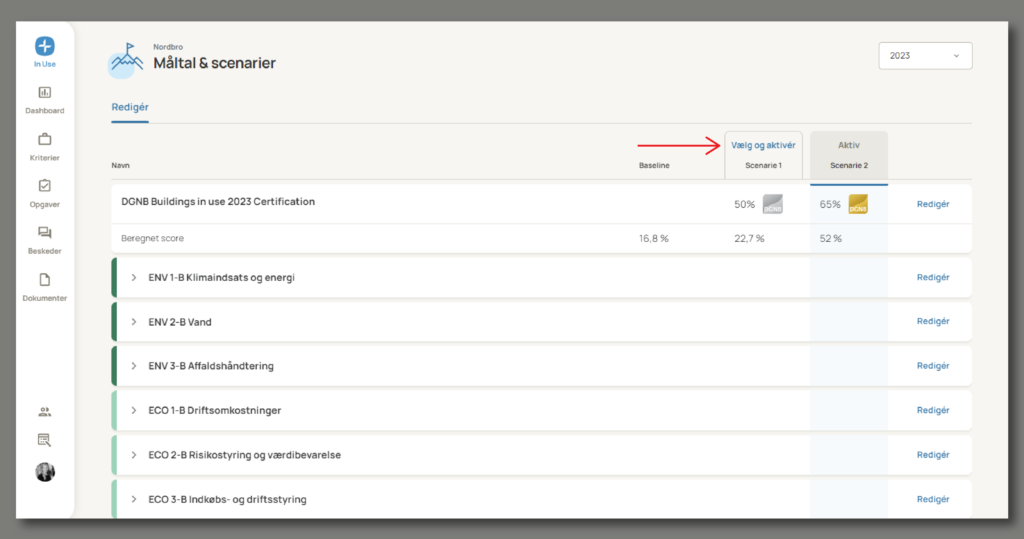
- Choose which of the two mapped scenarios to work on
- Click “Select and activate” on the selected scenario
The target figures on the selected scenarios will now be visible on the indicator tasks
The overall objective will appear on the dashboard and on the criteria page
- Project criteria
- Assignment of tasks
You can assign tasks to specific people or teams to give a better overview to contributors. Watch this video to see how you can assign tasks quickly and efficiently:
- Navigate to the “Project criteria” page
- From here, you can then go to the task or select one or more tasks you want to assign in the selection box on the left
- Then press “Assign task” and select which user or team should have the task assigned to them
- Finally, click “Assign” and the user/team will now receive an email if they have been assigned a task and can also see it on the “Tasks” page
- Set deadlines on tasks
You can set deadlines for tasks via the “Project criteria” page. This can either be done for several at a time or one at a time:
- Navigate to the “Project criteria” page
- From here, you can then go to that task or select one or more tasks you want to set a deadline for in the checkbox on the left
- Then press “Set deadline” and select the date you want the deadline to be
- Finally, press “Save” to save the deadline on the task(s) you have selected
- Skip tasks
You can skip tasks from the project in the “Project criteria” page. Here’s a video on how you can do it quickly and easily:
- Navigate to the “Project criteria” page
- From here, you can then go into that task, or select one or more tasks you want to skip in the checkbox to the left
- Then press “Skip tasks”
- Finally, press “Skip” to skip the task(s) you have selected
- Status and reporting
- Export project data
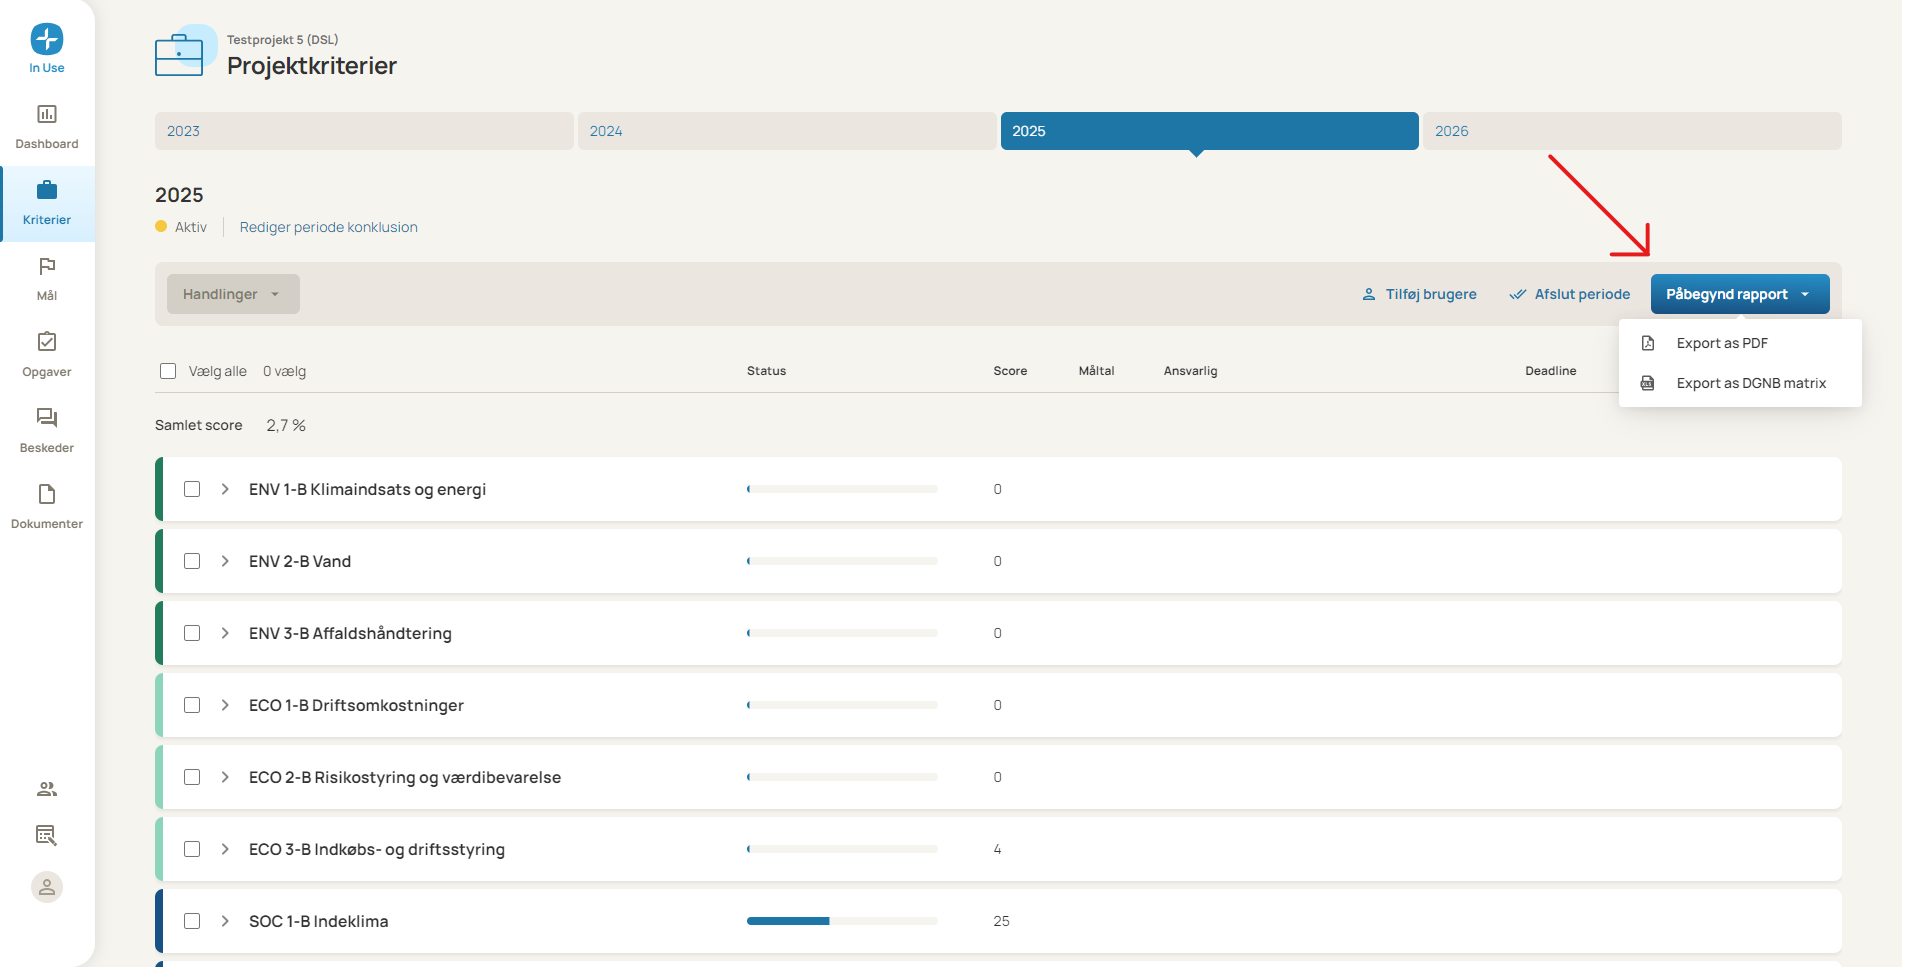
You can export your project to PDF or DGNB matrix by following these steps.
- Go to “Criteria”
- Select the period you want to export
- Tap “Start report”.
- Choose to export either as PDF or DGNB matrix
- After a short time, a download of the report will start in your browser
- EU Taxonomy
- Add EU Taxonomy to your project
You can add the EU Taxonomy as a criteria template for your project. This can be done by following these steps or watching the video to the right
- Go to “Project configuration”
- Go to the “Criteria collections” tab
- Tap “Add template” from the EU Taxonomy
- Here you need to fill in the given information about your project and press “Save” to add the criteria collection
- You can now add periods in the same way as DGNB under “Process & periods” (See the Add period guide)
- Under the “Criteria” page, you will now be able to see your Taxonomy periods. (If they are not visible, please select the correct criteria template in the top right corner)
- Contributor
- Getting started
- First time you log in to the platform
Once you’ve been invited to a project, you should receive an invitation by email (remember to check your spam folder if it hasn’t popped up). Then follow the steps below to set up your account:
- Access your invitation email and click the link to enter the login page
- Tap “Forgot password”
- Enter your email and press “Send”
- You should have received an email about password reset by now
- Click the link in the email to reset your code
- Enter a password of your choice and finish by pressing “Reset code”
- On the login page, you can now log in with your email and the code you just created
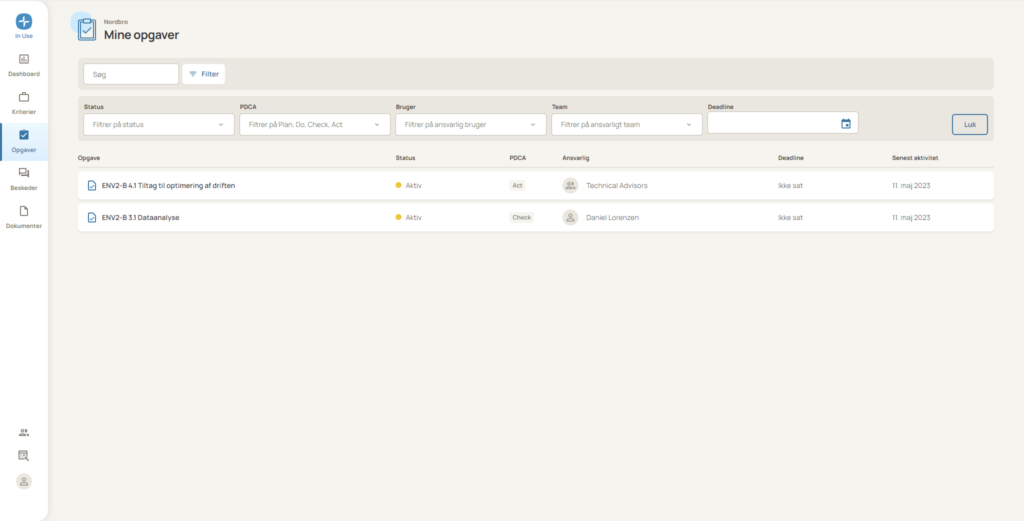
- Access your tasks
You can easily see only the tasks you have been assigned under the “Tasks” page. As a contributor, you can only see the tasks assigned to you or your team. You can filter by specific things like status, deadline, etc.
